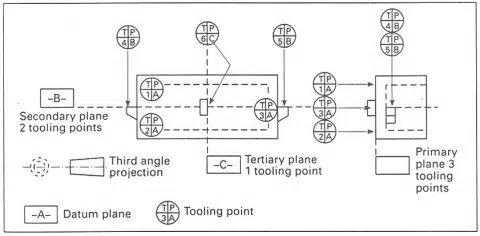
Recalling basic Geometry, three points are required to define a plane (-A-), two additional points to define a perpendicular, secondary (-B-), plane to the primary and one additional point to define a tertiary plane perpendicular to the first two (-C-). As castings are never perfectly flat, straight or square, this Geometric fundamental is often used by Casting Designers to establish a datum structure from which to obtain a consistent measurement of cast parts. Moreover, Datum Points allow a casting to be machined from the same datum structure.
The selection of datum surfaces, and assignment of the datum point (also called Tool Points) locations, is a critical consideration for good casting design, so here are a few helpful tips:
Generally the longest & largest surface of a part is designated as the primary (-A-) datum surface. The second largest perpendicular surface would then be then designated as the Secondary (-B-) and the Tertiary (-C-) a surface perpendicular to the first two. For example envision a Shoe Box, with the floor of the Box being Primary Surface the longest side as being Secondary and the short end as being Tertiary. Although most castings are not as straightforward as a Shoe Box, the same logic applies.
Once the datum surfaces are determined, Datum Point locations, with three points on the Primary, two points on the secondary and one on the tertiary need to be designated on each of the datum planes. By placing the part against these six datum points, generally a Tool Point Fixture, a casting then can be measured from the theoretical planes using either a height gage or CMM probe.
