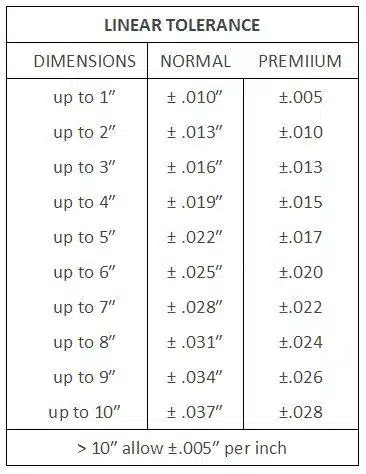
Relative to other foundry processes Investment Casting is a very precise method to produce a Near-Net shape cast product. This capability stems both from the repeatability of the process and that a draft angle need not be added to cast surfaces. As with all manufacturing processes there will exist some part-to-part variation that needs to be accommodated by a dimensional tolerance.
The standard design guidelines for the industry have been established by the Investment Casting Institute. This includes standards for linear tolerance as published by the ICI in the Investment Casting Handbook. Their recommendations for linear tolerances are shown in the above table.
To correctly apply the tolerances from this table it is first important to have a clear understanding of what constitutes a linear dimension. If we first understand that cubic inch is a volume of 1” x 1” x 1” and then that a square inch is an area of 1” x 1” then it follows that a linear inch a length defined as the distance between two points (1”).
Therefore, any dimension to a feature that can be measured with a ruler or a pair of calipers should have applied a linear tolerance from the table.
However, properly applying the table can be confusing for Designers when tolerancing non-linear features. Castings, for example, are frequently measured from a datum structure that is established by datum points. When measuring a casting from datum points we no longer have a linear point-to-point measurement but a non-linear point-to-plane dimension and the size and shape (flatness & perpendicularity) of the plane must now be taken into account.
Take the instance of a table top. If we were to measure the thickness of the table top with a pair of calipers we then have a linear dimension to which a linear tolerance should be applied. However, if we instead to measure the height of the table top from the floor and run an indicator across the area of table top we would expect to receive a much wider measurement variation because the table top is not perfectly flat nor square to the floor and the amount of variation would be relative to the size of the table top.
When measuring a casting from a datum structure the size of the feature and the distance from the datum both need to be taken into account in the tolerance. So in addition to the linear tolerance per the table an allowance for .005”/inch of tolerance must be provided to account for variations flatness, perpendicularity and parallelism of the casting.
As a general rule of thumb Engineers should consider the farthest feature that being measured from the 0,0,0 point of the three perpendicular datums. If the longest measurement was for example 10” the tolerance from the table for that linear segment would be ±.037” or an equivalent profile tolerance of .074” of the part from the datums.
For instances where it is necessary that a design include a tolerance of a feature that is tighter than the industry standard it is important consult with a foundry to assure that the desired capability is manufacturable. Even if the foundry feedback is negative or perhaps finds that additional tooling will be required, it is always better to engineer a manufacturable design than to deal with the cost and consequences of one that isn’t.
For further information contact O’Fallon Casting.
To purchase a copy of the Investment Casting Handbook contact the Investment Casting Institute:
Investment Casting Institute
136 Summit Avenue
Montvale, NJ 07645-1720
